Tree Trails for Users
Connect with your local environment through outdoor learning and exploration. From groups to individuals, Tree Trails makes it easy to learn new skills and contribute to citizen science projects that sustain and protect Texas’ trees and forests.
By creating a Tree Trail, you can gather real data for conservation projects, celebrate your neighborhood trees, and raise awareness about their value in your community.
Creating your first trail
Download the Tree Trails Quick Start Guide to get started or follow along below.
Step 1: Select your location
In either the website, or in the mobile app, enter the GPS coordinates of your first tree. You can choose to search by address or use latitude and longitude coordinates (Lat,Long).
Tip: GPS readings are entered in decimal degrees as longitude space latitude in this Navigation Field.
Step 2: Add a trail
Tree Trails allows you to enter tree data in stages. After the trees are marked, the trail is created. You can add some or all data to individual trees at any time. If any data is missing, the tree is shown with a white hole. When all data is entered, the tree becomes solid green.
Click the Add Trail button and select trees in the order you wish them to appear. Each tap or click will add a tree to the map trail.
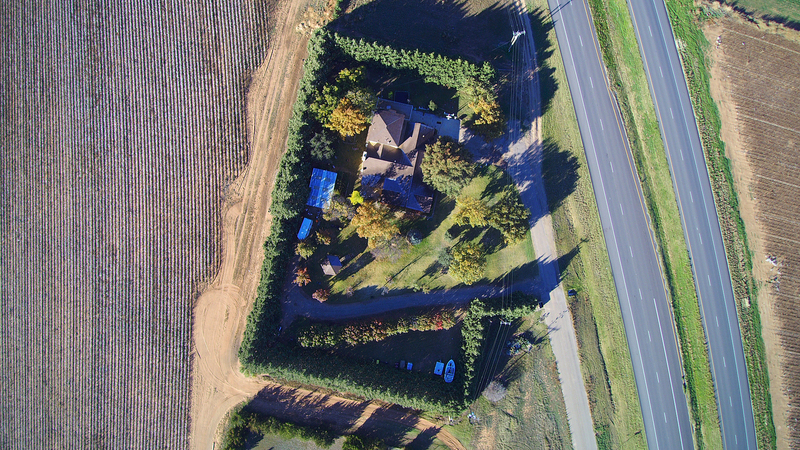
Tip: You can switch between street view and satellite view within the map. Satellite view provides an aerial perspective of the natural landscape and can be helpful when identifying tree locations from above.
Step 3: Double click to end the trail
When you’re ready to enter your final tree, tap once to enter its location. Then, double tap or double-click on the tree you entered to end the trail and exit the Add Trail feature.
You will now see the trail you have created, showing the trees in sequence connected by a green line.
To create a trail, you must enter details of at least one tree in a series. A pop-up reminder will appear prompting you to add tree measurements. Tree icons with white circles indicate the tree is missing necessary data. Click OK the notification or tap the map again to downsize the pop-up reminder and proceed to step 4.
Step 4: Select the green trail line to name it
To name your trail for easy identification in the future, click or tap directly on the green line between the trees. A pop-up window will appear and allow you to enter trail details.
These fields save automatically during entry, so when you are finished entering your information, simply click the x in the top right corner to escape the pop-up, saving your entry.
Tip: To ensure your trail details are saving correctly, tap the trail line again and open the details window. Your details should appear in the pop-up, however cellular service and wifi disruptions can impact data entry and retrieval in the app. If your data does not appear, check that you’re connected and try again.
Step 5: Select an Individual Tree to Begin Entering Data
Once your trail is named, you’re ready to start entering data about the trees. Click or tap on one of the trees in sequence to open the tree details pop-up.
Enter the necessary data fields. To calculate your trees’ benefits, you’ll need to enter at least species (common name), diameter, height, crown spread, and tree condition.
Images of the trees can only be uploaded through the mobile app.
Tip #1: When entering tree species, the field automatically searches the database based on your input. If you see an error message indicating the value entered is not valid, remember that tree names are organized by genus common name first. For example, for Post Oak, start by typing “Oak” to reveal the list of available species in that family.
Tip #2: To limit “Missing Data” pop-up reminders, it can be helpful to enter tree data in the order that they appear in your selected trail.
Step 6: Print or Share Your Trail
Once your trail and data entry are complete you can click the Print Trail button in the desktop app. This will automatically generate a report as PDF download that contains a summary of your trail, tree values, and defining features.
Limited internet connectivity can increase the time it takes for the database to generate your report.
Collecting data
Learning to measure trees and record data requires some simple skills that can be learned by following along with the app and the guide below. To calculate your tree and Tree Trail values, you’ll need the following:
Tree order – you decide what order the trees will appear in the Tree Trail.
Location – record address or latitude and longitude to assist in navigating to the tree within the web app. GPS readings are entered in decimal degrees as longitude space latitude in the Navigation Field.
Tree Species – enter common name or use drop down menu. If your species is not listed, choose the Genus, Other, Coniferous or Other, Broadleaf. Please email us about trees not listed.
Diameter – units are inches (can be calculated using circumference. The formula to convert circumference to diameter: D = C / 3.1415D=C/3.1415).
Height – units are feet.
Crown Spread – units are feet.
Condition Rating – indicate good, fair, or poor.
Comments – record any notes about the tree or group as needed.
Step 1: Identify your tree
Recording your tree species is required to calculate its value. Identifying your tree’s species can be done two ways.
ID with an app
Download a tree ID app. Follow the directions in the app to match your tree to its common genus and species name (for example: Live oak).
Learn to ID with dichotomous key
Download the Getting Started on Leaf Characteristics resource page.
Dichotomous methods for tree ID allow new learners to narrow down possible species matches through a process of yes/no elimination questions. This method requires observational analysis of the leaves, bark, and branch or twig structure of a tree.
Step 2: Measure your tree
Download our Tree Measurement Guidelines resource page. You can also use the Tree Trails Data Sheet to record measurements by hand before entering them into the app.
All recorded measurements should be rounded down to the nearest whole number.
Tools you need:
- Measuring tool: such as logger’s tape, or tape measure (50-100ft long), or
- Digital measuring application.
Step 2.1 Measure tree diameter
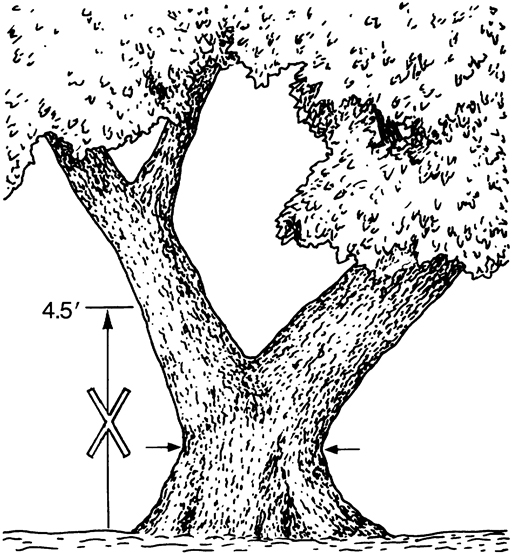
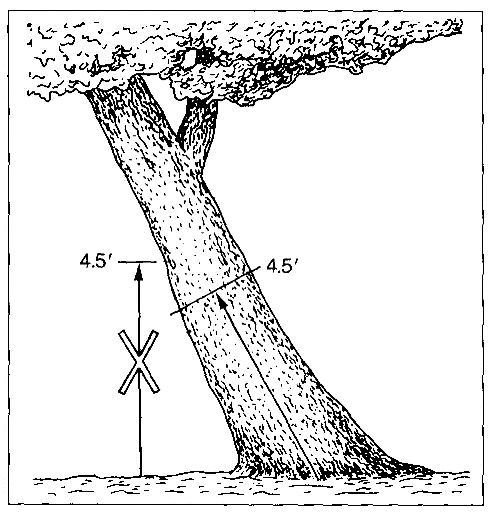
Diameter is the distance across the tree, side to side, straight through the center. Measurements should always be taken at 4.5 feet from the base of the tree. Also known as Diameter at Breast Height (DBH).
Calculating diameter using circumference
- Step 1: Find the smallest trunk circumference at DBH.
- Step 2: Wrap your measuring tape around the tree at the DBH height.
- Step 3: Measure and record, in inches, that smallest trunk circumference. If the tree forks, measure below the lowest fork. (see Example B below)
- Step 4: Lastly, convert the circumference to diameter with the formula D = C / 3.1415. Enter the diameter measurement in the online data sheet for the tree.
Considerations for Determining DBH Point
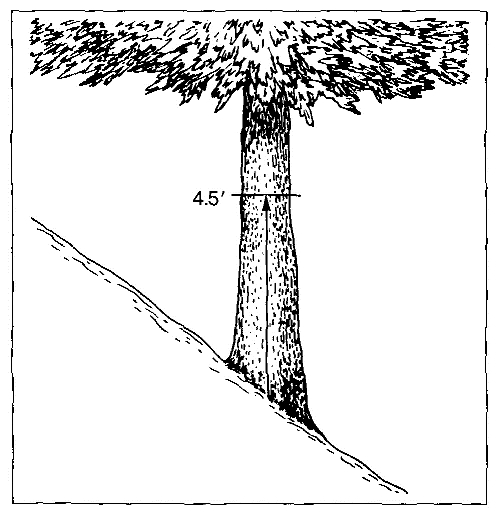
Tree on slope: Measure up 4.5 feet along the axis of the trunk on high and low sides. DBH point is midway between these two planes. (see Example C below)
Leaning tree: Measure 4.5 feet along both the top and undersides of the trunk. DBH point is midway between these two planes. (see Example D below)
Low branches: When determining where on the trunk to measure circumference, ignore portions that do not form part of the tree’s crown, such as dead branches or forks, and epicormic sprouts, which are ones that grow from the trunk or branches.
Obstruction at DBH: If there is a bump, burl, branch, or other obstruction at the DBH point, measure the circumference above and below the obstruction and record the smaller value. A buttress that forms between the trunk and root system as a natural feature of the species (e.g. baldcypress, water tupelo) should not be considered an obstruction.

Step 2.2 Measure tree height
Recording data
All recorded measurements should be rounded down to the nearest whole number.
Foresters round down in tree measurements instead of rounding up because the tree has not yet reached the higher measurement. They keep to whole numbers because of the relative accuracy of repeatability. Roughed up bark and even relative humidity can make small differences. As can having the tape measure less than perfectly perpendicular to the centerline of the trunk.
Height
Find the vertical distance between the ground and the tallest part of the live crown.
Record the measurement in feet. Also record the method used to determine this value. Method choices include direct measurement [telescoping pole, climbing], clinometer, hypsometer, relascope, laser rangefinder (with or without internal clinometer), stick method, pencil method, comparison, or wild guess.
Yardstick method
Watch a video of Dr. Dean Coble and Jason Grogan illustrate how to measure the height of a tree using a yardstick. Stephen F. Austin’s Arthur Temple College of Forestry and Agriculture.
Pencil method
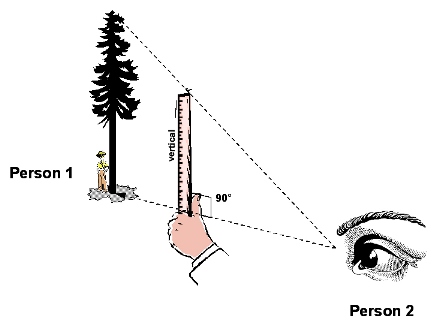
1. Person one stands near the trunk of the tree. Person two stands far enough away to see both Person one and the top of the tree.
2. Person two holds a pencil (or ruler) upright at arm’s length and (carefully!) walks forward or backward until the entire length of their ruler covers the tree from base to top. (see Example E below)
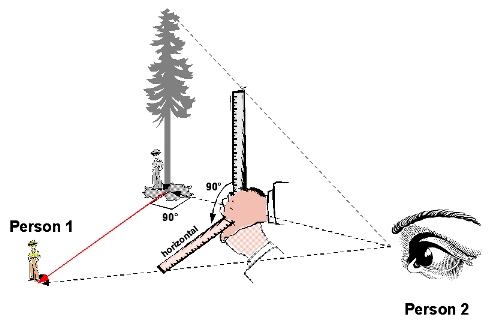
3. Still holding the ruler at arm’s length, Person two turns their wrist right or left so that the ruler is now horizontal, with one end even with the base of the tree.
4. Have Person one move away from the trunk in the direction the ruler is pointed (at a 90 degree angle) until they are standing where the end of the ruler points. (see Example F below)
5. Person one is now standing roughly the same distance from the trunk as the tree is tall. Use a tape measure to record this distance, in feet.
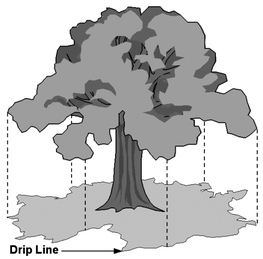
Step 2.3 Measure crown spread
How to Measure Crown Spread
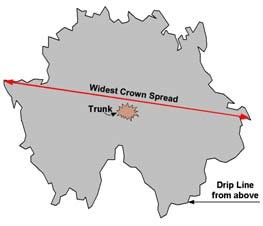
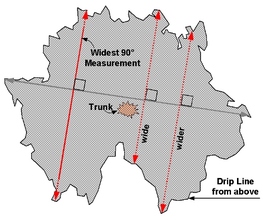
Along the drip line of the tree, you will take two measurements of the crown width at right angles, or perpendicular, to one another. Then, you will average the two measurements for the crown spread.
Drip Line: the outline on the ground of the outermost leaves of the crown. Include only live portions of the crown. (see Example G below)
Measurement 1: find the widest crown spread, which is the greatest distance between any two points along the drip line and measure the length, in feet. (see Example H below)
Measurement 2: turn the measurement line 90 degrees, or perpendicular, from Measurement 1’s line, find the widest crown spread along this plane and measure the length, in feet. (see Example I below).
Tree benefits breakdown
Advances in the science of urban and community forestry allow us to assign monetary values to a range of benefits that trees in urban areas provide. As trees grow, these values rise – the only part of the built environment of our cities that does so.
Tree Trails analyzes the values of the trees using the measurements users enter. These benefits are illustrated in the Tree Trails dashboard displaying overall and cumulative values. You can also view the benefits of individual trees or grouped tree trails by selecting the tree icon or the green line connecting the Tree Trail.
Benefits explained
Stormwater intercepted
Trees reduce stormwater runoff and help regulate stream flows. Water runoff from surfaces like roadways and parking lots wash chemicals like oil or gasoline into streams, wetlands, rivers and oceans. These chemicals may harm drinking water, aquatic life and the ecosystem. Arbor Day Foundation stormwater resources.
Air quality
Trees improve air quality. Leaves absorb air pollution that causes asthma, coughing and other health issues. Leaves also help remove dust and other matter from the air, then rain washes it to the ground.
Carbon dioxide
Trees help reduce atmospheric carbon. They absorb carbon dioxide during photosynthesis. Trees store carbon dioxide in their roots, trunks, and leaves while they grow.
Energy savings
Trees alter climate and conserve energy use. Trees help buildings use less energy. In summer, trees shading east and west walls keep buildings cooler. In winter, allowing the sun to shine on the southern side of a building can warm inside spaces. Trees slow down winds around buildings and help decrease heat loss.
Property value
Trees in front of homes increase property value. Research has verified this by showing that homebuyers are willing to pay more for properties with more trees. Download an overview of annual benefits.
Boost your homes energy efficiency by planting trees
Explore how planting trees around your home can help reduce energy costs.