Guide for planting of pine seedlings, container or bareroot, in the area primarily east of I-45 known as the Pineywoods region of East Texas, and primarily in the Natural Resource Conservation Service (NRCS) Major Land Resource Area (MLRA) Regions 87B, 133B, 150A, and 152B.
For information regarding planting and establishment of Longleaf Pines, please see Longleaf Pine Establishment.
Purpose
- stablish or reinforce a stand of trees
- Encourage and expand economically desirable wood production
- Improve quality of soil, air, and water resources
- Provide suitable wildlife habitat
- Protect watersheds
- Enhance aesthetic value
Applicable to
- Open fields
- Understocked woodlands
- Prepared sites
- Beneath less desirable tree species where most of the overstory will be removed within the calendar year (caution should be taken to ensure minimal damage to planted seedlings)
Species to consider
- Loblolly pine
- Shortleaf pine
- Slash Pine (Rust and disease resistant varieties only)
Planting date
Planting should be done during optimal conditions and when soil moisture is adequate. Planting should be completed between Dec. 1 and April 1 for Northeast Texas (north of Interstate 20) and Dec. 1 and March 15 for the rest of East Texas.
Containerized tree planting can begin as early as October if soil and weather conditions are favorable. Reforestation activities may be restricted if environmental conditions create a high risk for survival of the planted seedlings.
Planting rate
Seedlings planted for wood production should be spaced so they may grow normally up to the time of first cutting or harvest. Rows should be no less than eight feet apart. The number of properly planted seedlings must be no lower than 15% below or 10% higher than the bid specification.
Although overall per-acre stocking of a tract may be within the allowable stocking range, it may be undesirable for some areas to be overstocked and some areas to be understocked. When planting adjacent to borders or fences, allow enough space for future fire suppression efforts or other equipment if necessary.
The following table shows common spacings with allowable margins:
| Spacing (ft.) | Trees per Acre (TPA) | Allowable Range (TPA) |
|---|---|---|
| 8 x 8 | 681 | 579 – 750 |
| 6 x 9 | 806 | 685 – 887 |
| 7 x 9 | 691 | 587 – 760 |
| 6 x 10 | 726 | 617 – 799 |
| 7 x 10 | 622 | 529 – 685 |
| 8 x 10 | 545 | 463 – 599 |
| 9 x 10 | 484 | 411 – 532 |
| 10 x 10 | 435 | 370 – 479 |
| 8 x11 | 495 | 421 – 545 |
| 6 x 12 | 605 | 514 – 666 |
| 8 x 12 | 454 | 386 – 499 |
| 10 x12 | 363 | 309 – 399 |
| 10 x 15 | 290 | 247 – 319 |
| 15 x 15 | 203 | 173 – 223 |
| 10 x 20 | 217 | 184 – 239 |
| 15 x20 | 145 | 123 – 160 |
Planting method
Machine or hand tool planting must be done using equipment capable of producing a 10-inch-deep planting slit. Hand planting tools should be limited to dibble bars, plug bars, planting shovels, hoedads, or sharpshooters and must have blades at least three inches wide.
Creating an hourglass-shaped hole with a dibble bar is unacceptable. When using a dibble bar, a second hole is required to close the bottom of the first hole. For additional information as well as illustrations demonstrating proper planting techniques for both hand and machine planting operations.
When machine planting, precautions must be taken to obtain proper depth of the planting trench, correct tracking of the packing wheels, and proper closure of the trench. In addition, no debris should be allowed to fall into the dug slits. The planting machine should be routinely checked to make sure that the seedlings are properly packed within the planting trench. This can be done by grabbing three to five needles from the seedling and gently tugging. If the seedling is loose (i.e. the seedling moves up and down) it is not being properly packed. In this case, the operator should stop planting at once and readjust the packing wheel. Also, seedlings should be checked to ensure they are being planted at the proper depth so that the roots are not left exposed.
Seedlings should be properly cared for during pickup, transportation, and storage to ensure they are not damaged or exposed to adverse conditions. Detailed instructions for seedling care can be found in the sections below and should be followed.
Both openland and wildland planting machines should be inspected before planting begins to ensure that they are functioning properly, and seedlings are being planted correctly.
Proper equipment for handplanting
- Dibble bar – Should have a blade at least 10-12″ long and 3-4″ wide.
- Plug bars – Generally have a round or conically shaped blade that is approximately 6” long and 1.5” diameter and should only be used for planting containerized seedlings.
- Planting shovels – Generally are shovels with an approximate length of 11”.
Proper planting for bareroot seedlings
- Correct depth – Planting tool should be inserted as deep as possible. Seedlings should be planted with the root collar at or below ground level with a minimum of one inch to the bud of the seedling above ground without J rooting.
- Pack properly – Make sure soil is firmly packed around seedlings. This is accomplished by using the dibble bar (a second hole or slot is not necessary when using planting shovels) to make a second slot and levering the soil tight against the seedling. This second hole should be stomped closed after planting to minimize soil dryness. Check this by grabbing three to five needles from the seedling and gently tugging.
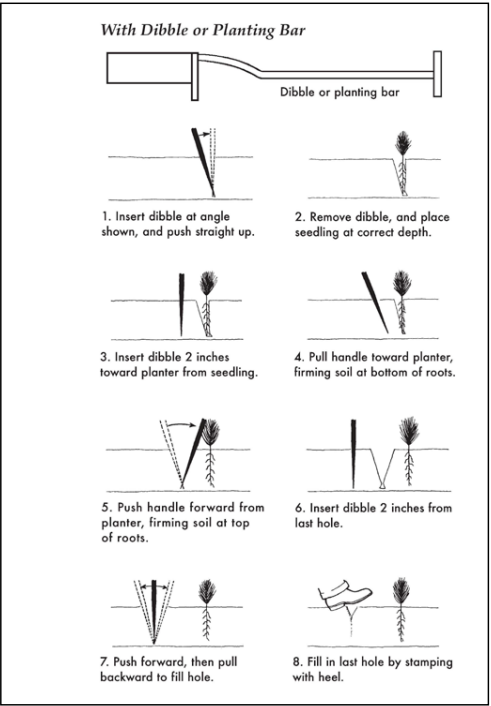
Proper planting for container seedlings
Seedlings should be planted deep, with the top of the plug below ground level. Seedlings planted with a dibble bar may require a 2nd dibble hole to pack the seedling properly. The second hole should be stomped closed after planting to minimize soil dryness. If planted with a plug bar, the soil around the seedling should be packed snuggly with your foot after planting but a second hole is not needed.
The following illustration shows proper hand planting technique:
Proper planting criteria
- Soil must have adequate moisture at time of planting and must be packed firmly around the planted seedling. All seedlings must pass a “four-needle” test (i.e. seedlings must remain firmly planted when pulled by four needles).
- Roots should be planted vertically with only lateral roots in a horizontal plane. A root angle of up to 30 degrees from the vertical is permissible.
- Roots should not be twisted, balled, or planted in U-, V-, J-, or L-shaped manner. Plantable seedlings (not culls) that are otherwise properly planted may have a J- or L-shaped bend at the end of the roots if the bend does not exceed one inch.
- Seedlings must be planted such that the root collar is at or below ground level. On sands or excessively drained soils, seedlings should be planted deeper. A minimum of 1 inch to the bud of the seedling should be above ground. See above illustration.
Seedling care
Seedlings in both boxes and bags should be placed in cold storage as soon as possible. Once seedlings are removed from cold storage, they should be planted within two weeks of removal.
Proper care of seedlings from lifting and packaging until they are actually planted is extremely important. The most vital precautions involve keeping the seedlings moist, not allowing them to dry out, freeze, or experience excessive heat. And storing them properly until the seedlings are properly planted.
Cold storage is highly recommended for bagged seedlings whenever possible. Dormant seedlings can be held at temperatures from 32 – 40° F for no more than 10 weeks. If cold storage is not possible, then seedlings may be placed on racks. When storing on racks, bags should be kept in shade, protected from wind and weather, and not allowed to dry out or freeze.
Bags should be stored no more than three deep and rotated every few days. Exposure to freezing temperatures and air temperatures greater than 70° F for two hours is unacceptable and can result in a major decrease in seedling survival. Seedlings must be protected if they are left on the job site overnight (i.e., covering or storing in a structure and stacking properly).
Small tears in bags should be patched with duct tape. Tears that cannot be fixed with tape will require placing the torn bag in another seedling bag. Torn seedling bags should not be placed in garbage bags as the seedlings are more susceptible to overheating. The date and seedling type information must remain with the seedlings. Prior to taping, torn bags should be checked to make sure the seedlings have adequate moisture.
Damage to seedlings should be avoided during handling. Seedlings should never be ripped apart, as this can damage the root systems, foliage, or cambium. Never allow seedlings to dry out, freeze, or get too warm. Exposure of the root system in the open for more than 20 minutes should be avoided. Trees culled ahead of time should be covered with wet burlap or Terra-sorb® or soaked in water if the 20-minute period is exceeded. Seedlings should be covered in the planting trays or kept moist by other means (e.g. Terrasorb®). Ideally, the internal bag or box temperatures should remain below 65° F. Bags or boxes should not be exposed to direct sunlight, as an internal temperature of 85° F or higher within the bag will be lethal.
Root pruning can be performed in the field if necessary. Roots should be pruned using a sharp instrument. Roots may only be pruned if their total length exceeds seven inches, at which they may only be pruned back to a seven-inch length. Removing roots by pulling should be avoided, as this can damage other parts of the seedling.
Additional care for container seedlings
Containerized seedlings need to be watered. Boxes with seedlings stored vertically are better than those stored horizontally as they are more easily watered. Boxes should not retain water after watering. Use heat shield tarps to protect the seedlings in the field.
Storage of seedlings before planting and during transport
- Seedlings should be picked up from the nursery as close to the planting date as possible.
- Store seedlings in cold storage until the planting date.
- Keep containers closed to minimize drying of the roots.
- Seedlings should be transported in an enclosed trailer if possible, but at the very minimum they should be covered to protect containers from possible wind damage.
Storage of seedlings during planting
- When possible, take only as many seedlings to the tract that can be planted in one day.
- When on site, seedlings should be stored in the shade, in a structure, or under an insulated tarp to protect them from excessive heat and cold.
- The temperature for boxes containing seedlings should remain above freezing (32° F) and below 65° F.
Bareroot seedlings should be inspected and culled prior to planting, and seedlings that do not meet the proper specifications should be discarded. If the number of cull seedlings in a bag exceeds 10%, the nursery producing the seedlings should be contacted.
Seedling issues
- Small root collar diameters – seedlings with root collars less than 1/8”
- Crown less than 5” length – from the root collar to the bud should be greater than 5”
- Tap root less than 5” – tap roots should be greater than 5”
- No lateral roots – seedlings should have several lateral roots coming off the tap root
- J- or L- rooting – seedlings with taproots that are J or L shaped out of the container
- Dry seedlings – seedlings that are very dry (usually due to damage to the container and/or improper storage)
- Disease – seedlings that show signs of fusiform rust, or have galls or balled roots
- Discoloration or a weak stem – usually indicates the seedlings have become overheated in the bag and will not survive if planted
- Moldy or rotten odor – usually indicates the bag has overheated and/or there was too much moisture in the sealed bag.
- Bag data – lift date, storage date, correct species, variety, and related seedling information for the site
Protection
Grazing should be excluded from all planted sites for the first five years or until the terminal bud is four to five feet above ground level. Damage from grazing will be the liability of the landowner. The livestock stocking rate should be acceptable for the available forage as defined by local professionals.
Firebreaks should be constructed around the perimeter of the planted site to reduce the probability of a wildfire entering the property. In the event a wildfire enters the site, firebreaks will assist firefighters in controlling the wildfire. Larger plantations of more than 50 acres should have firebreaks established through the tract to minimize potential risk from wildfire.
When applicable, it may be necessary to treat a tract for insects and diseases, particularly for Texas leaf cutting ants and pocket gophers. Our forest health specialists should be consulted for additional information on pesticides and control methods.
Seedlings may often become damaged prior to or following inspection by pests or wildlife. Pest damage should be noted in comments but should not count against the vendor if noticed during inspections. The following pests can damage seedlings after planting.
Texas leaf cutting ants. These ants are typically found on sites having sandy soils. They harvest green vegetation and store it underground to grow a fungus that is used for food. They typically do most of their damage to pine seedlings during the winter when there is little green vegetation except for evergreens. When possible, the site should be treated before planting begins.
Livestock. Livestock should be kept off planting sites for a minimum of four to five years because they will browse off of trees, pull them up, and/or stomp them as they graze.
Deer. Deer at times will bite tops off seedlings while they are small, but as the trees grow to three to four feet tall, deer will rub their antlers on them.
Hogs. Hogs will root up freshly planted trees, especially on machine-planted jobs where the soil had been loosened by the planting machine.
Rabbits. Rabbits will at times bite seedlings off, making them appear like they were snipped off by a knife or pair of scissors.
Gophers. Gophers will attack the roots of a seedling and sometimes pull the seedling completely into the ground as they feed. Small dirt mounds are typically present in the areas where seedlings are being damaged. When possible, gophers should be controlled before planting begins.
Environmental considerations
All Texas Best Management Practices for forestry should be followed during all reforestation and other silvicultural operations.
When using chemicals for herbaceous weed or pest control, follow all regulations and directions on the label. Pesticide applicators must have a certified applicator license from the Texas Department of Agriculture.
All chemicals must be federally and locally registered for proper use. All application of herbicides and pesticides must be done with extreme precaution to avoid potential pollution of food and water supplies.
Quality assurance
Quality assurance (planting inspection) should be completed within 5-10 days (ideally during planting) of the planting operation being completed. Failing to complete planting inspections during planting may not allow enough time to replant areas or the entire tract if necessary and may cause the replanting to be postponed until the next planting season.
Also, if it is determined within a timely manner that the cause of a failed inspection is due to poor contractor performance and/or seedling quality, the landowner can hold the contractor and/or nursery responsible. In the past, planting inspections that have been conducted several months after completion of the planting operation have created problems in determining the cause of the failed planting practice, leading to the contractor and/or the nursery not being held responsible. Furthermore, you are not able to request cost-share reimbursement until the tract has passed inspection. Delaying planting inspections may extend the wait period before you can receive compensation, which may create economic hardship.
If you are receiving consultation from a forestry or natural resource professional in planning their tree-planting, they should be notified of the time planting begins, to allow them to visit the site early in the planting process, and to reduce future potential issues.
Parameters for conducting planting inspection
Before beginning an inspection, you will need the following equipment:
- Tract map with plot grid
- Compass or GPS to find plots
- Something to measure plot radius – (1/100th acre is 11.778 ft; 1/50th acre is 16.7 ft; 1/20th acre is 26.3 ft)
- Writing utensils
- Seedling inspection sheet
- Calculator
- Pin flags to mark plots
- Sharpshooter to check for underground problems
- Seedling specifications – species, variety, nursery, quantity
- Planting specifications – spacing, mechanical/hand, etc.
- Weather conditions during planting and at the time of the inspection should be documented
Acreage, plot size, and job quality can determine the number of plots needed. Seedling row width should be considered when determining the plot size. The following parameters for selecting plot size should be used at the discretion of the forester conducting the inspection:
- Row widths less than 12 feet: 1/100th or 1/50th acre plots
- Row widths 12 to 15 feet: 1/50th acre plots
- Row widths greater than 15 feet: 1/20th acre plots
The following provides a guide in determining number of plots needed per acre and plot spacing by tract acreage:
| Tract Size | 1/100th acre plots | Spacing Feet (chains) | 1/50th Acre Plots | Spacing Feet (chains) | 1/20th Acre Plots | Spacing Feet (chains) |
|---|---|---|---|---|---|---|
| 1 to 50 acres | 1 per acre | 211’ x 211’ (3.2 x 3.2) | 1 per 2 acres | 295’ x 295’ (4.5 x 4.5) | 1 per 5 acres | 467’ x 467’ (7.1 x 7.1) |
| 51 to 100 acres | 1 per 2 acres | 295’ x 295’ (4.5 x 4.5) | 1 per 4 acres | 417’ x 417’ (6.3 x 6.3) | 1 per 7.5 acres | 572’ x 572’ (8.7 x 8.7) |
| 101+ acres | 1 per 3 acres | 361’ x 361’ (5.5 x 5.5) | 1 per 6 acres | 511’ x 511’ (7.8 x 7.8) | 1 per 10 acres | 660’ x 660’ (10 x 10) |
Tract maps with plots laid out in the proper spacing (as listed above) can be created using newer versions of ArcGIS, or tools on Texas Forest Info. Also, many GPS units can be loaded with shapefiles with plot locations overlaid, which can also be used to help identify and navigate to each inspection plot.
Once at the tract, the inspector should orient themself and navigate to begin their inspection at Plot 1.
- Mark the center of the plot with a pin flag numbered to match the plot number.
- Using a plot radius tape or device, count and check all seedlings in the specified plot radius.
- Seedlings should be checked for proper planting depth, closure of the hole, and packing of the seedling into the soil. (See above ground problems section below)
- Results should be documented on the seedling inspection form
- When between plots (i.e. traveling from one plot to the next) carefully dig up two seedlings and check for underground planting problems (properly replant these seedlings afterward to maximize survival). This should not be required for plantings involving seedlings grown in containers. See below ground problems section below.
- Results should be documented on the seedling inspection form
- Continue to the next four plots and repeat the above inspection process.
- After Plot 5, the inspector will need to calculate the excavation factor. The excavation factor is the percentage of good seedlings being dug up and can be calculated by dividing the number of good trees that have been dug up by the total number of seedlings that have been dug up. See Calculating Excavation factor example below.
Above ground problems
- Spacing – Improper spacing will cause either too many or too few seedlings per acre.
- Too shallow or deep – Bareroot and container seedlings should be planted according to the previous specs. See proper planting section above.
- Not packed – To check that seedlings are properly packed, they should have no up or down motion and remain firm in the ground when grasped and gently tugged. Seedlings that are not correctly packed will move up and down easily.
- Second dibble hole not closed – Additional holes used to pack seedlings should be stomped shut.
- Excessive lean in seedlings – Seedlings should not lean more than 30 degrees.
- Cull seedlings – Seedlings that do not meet the proper specs should be discarded.
- Exposed lateral roots – Lateral roots should not show above ground level.
Underground problems
- J or L roots – Taproots should be planted straight in the planting slot. This is checked by carefully digging up seedlings (usually two, unless you find reoccurring problems, then as many as four) at each plot to check for problems.
- Cull seedlings – Seedlings should have a top length of at least 18”, and the diameter at root-collar should be at least 3/8”. Root length should be 8-10″. Seedlings that do not meet these specs should be culled.
- Tap root less than 5” – Bareroot seedlings should have a minimum of a 5” taproot. If they do not, they should be culled.
- Improper pruning – Taproots and lateral roots should not be trimmed at all unless they are too long to plant without J- or L-rooting being a problem. The trimming of overly long roots should be kept to a minimum.
Example of calculating excavation factor
After 5 plots
10 total trees dug up
1 J-root for a total of 9 good out of the 10
Good trees divided by total = percentage or in this case 9 ÷ 10 = 0.90 or 90%
The excavation factor should be calculated after every 5th plot. If at any time during the inspection the percentage falls below 90%, the inspector should begin digging up four trees rather than two. While digging up four seedlings, if the percentage rises back above 90% then the inspector may resume digging up only two seedlings.
Once the entire tract has been inspected the inspector should then determine the total number of trees per acre. The total trees per acre should be within 15% below or 10% above the original planting prescription. Above-ground problems should be documented for each plot and deducted from the plot total while below ground problems will be deducted from the total inspection number and both will be used to determine whether the tract passes or fails.
Fall survival inspections
All tracts that are inspected in the spring after planting should be re-inspected in the fall to determine if enough seedlings have survived for a manageable stand in the future. These inspections should occur after summer weather has ended and significant moisture has been received.
All surviving planted seedlings should be counted. Minimum survival should be around 425 trees per acre. This can vary based on landowner objectives (species/genetics planted, pulpwood harvest, early sawtimber production, poles, wildlife, etc.).
“Volunteer” seedlings from natural regeneration should also be counted and tallied separately during fall survival inspection. Natural regen numbers can either help or hurt management objectives. Low numbers of well-spaced volunteers can bring planted survival numbers up enough for interplanting to be unnecessary. However, natural regeneration may also increase the number of seedlings per acre above the desired amount, introduce the incorrect species or worse genetics into the tract, create uneven spacing of trees, and so on. The landowner should be made aware of natural regeneration numbers in order to make sure that they don’t adversely impact future management objectives.
Inspection equipment
- Tract map with plot grid
- Compass or GPS to find plots
- Something to measure plot radius
- Writing utensils
- Seedling survival inspection sheet (some offices use the initial inspection form and others create their own)
Noted seedling issues
- Pest damage (leaf cutter ants, tip moth, hogs, deer, etc.)
- Large areas with low survival
- Human damage (mowers, vehicle traffic, herbicides, etc.)
- Herbaceous and woody competition
Underground problems do not need to be rechecked in the fall.